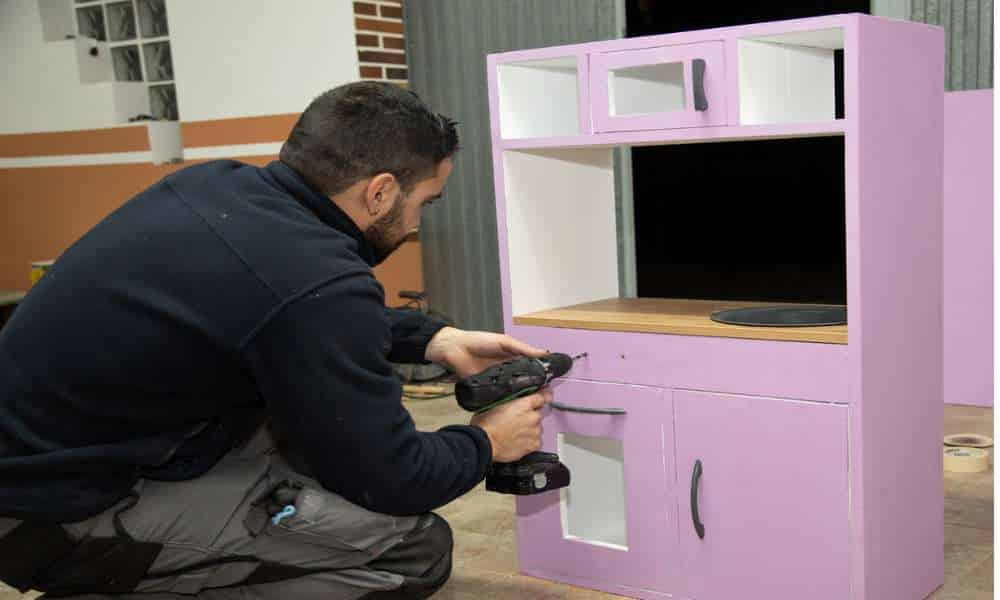
Assembling a Kidkraft Kitchen may seem like an impossible challenge, but its joyful outcome awaits its completion. Take part in imaginative play as we guide you through our “How To Build Kidkraft Kitchen” process – whether for your own child or as a gift. Using this guide will ensure a stress-free assembly experience! So get out your tools and enthusiasm, let’s build something amazing together.
1. Kidkraft Vintage Kitchen Instructions
Assembling the Kidkraft Vintage Kitchen requires an intriguing blend of retro design with modern functionality. As well as following an easy step-by-step manual provided to users. Prior to beginning assembly, all pieces must be laid out beforehand ensuring each part can fit securely into its designated spot. Following instructions closely ensures a successful outcome, and safety is ensured throughout its assembly. Although the process might seem time-consuming and patience must be applied when doing this task. Building this playset should become a rewarding experience over time!
2. Choose The Right Location
Opting for the ideal location can have a tremendous effect on any venture or setup. Be it business, event, or personal. Accessibility, ambiance, and safety must all be taken into account when choosing an ideal spot. Furthermore, natural lighting and proximity to essential amenities can make all the difference in terms of success and satisfaction. Don’t rush your decision; rather evaluate your needs, visualize the setup, and think long-term; as this decision could shape both life and business alike!
3. The Tools You Need
Making any project successful requires both passion and the right set of tools. From furniture assembly to fixing leaks or crafting masterpieces – the quality and suitability of tools make an enormous difference in the outcome. Basic household tools such as hammers, screwdriver sets, measuring tapes and levels will serve you well while more specialized tools such as power drills, saws, wrench sets or clamps may come in handy too – always ensure they’re in good condition and remember safety comes first! When investing in quality tools that meet all of your project goals investment can turn daunting tasks into manageable or even enjoyable projects! Investing in quality tools combined with knowledge of their use can turn daunting tasks into manageable or enjoyable projects!
4. Building The Main Structure.
At the core of any construction project lies building its main structure effectively. This critical stage establishes the overall stability and durability of the end result. Start by gathering all required components together; work methodically while checking alignment periodically during assembly. Take care not to shortcut construction efforts – taking shortcuts could cause complications down the line. A well-built main structure should provide long-term durability while remaining functional over time.
Assembling The Base
Crafting a solid base is integral to any construction or assembly project, serving as the bedrock that ensures stability and durability. A well-organized layout of all the components must begin here to ensure everything fits seamlessly together – as does adhering to instructions while fitting each part snugly together – thus eliminating issues further along the construction journey. Remember, starting on solid footing ensures a successful journey!
Installing The Countertop
A countertop is often at the core of many projects, defining both functionality and aesthetics. Installing one requires precise measurement for an even and secure fit – start by clearing away debris before aligning your countertop precisely to your base or cabinets below with recommended fasteners to achieve visual appeal and safety in equal measures. Correct alignment not only ensures visual appeal but also functionality and safety. As it serves as an often-used workspace in various setups, an efficiently installed countertop ensures longevity as well as seamless user experiences.
Setting Up The Stove And Sink
At the core of any functional space is its stove and sink; their setup requires meticulous consideration during setup. Begin by marking their designated spots on the countertop; ensure all electrical or gas connections are aligned on your stove; for your sink, double-check that its drainage and water supply lines are accurate before fixing them in place. Well-set stove and sink installations not only enhance aesthetics but also guarantee smooth workflow – thus making their position key during setup.
5. Finalizing The Details
As your project nears completion, It is the small details that truly bring it all together – both functionally and aesthetically – bringing the finished piece alive.
Cabinet And Oven Doors
At the core of any setup lies its facade: securely fastening hinges and ensuring doors open and close smoothly, while sitting flush against their frame, guarantees seamless operation and a professional appearance.
Attaching Handles And Knobs
Handles And knobs require careful placement. Position them at ergonomic heights And distances before securing them securely for maximum functionality while accentuating design elements.
Accessory Placement
Add finishing touches To complete the task. Place accessories in their proper places To enhance both the usability and visual appeal of your space. Accessories like spice racks, Utensil holders, Or decorative items add flair while providing added utility, Making your project complete.
6. Personalizing The Kidkraft Kitchen
Kidkraft Kitchens Are beloved favorites among young chefs. Customizing it To meet your child’s specific tastes makes the experience all the more satisfying And enriches their imaginative play experience.
Adhesive Stickers
Stickers Are an easy and cost-effective way To add some character and shine. From vibrant fruits To playful characters, Choose designs that reflect your child’s interests – And place them without air bubbles for An aesthetically pleasing finish.
Additional Toys
Introduce additional play items, Like toy utensils, Food sets, Or mini pots, And pans. Into the play experience for maximum fun in the kitchen. Not only can these additional elements enhance interaction but they can also lead To engaging scenarios. Unleashing your child’s culinary imagination!
7. Keeping Kids Away During Assembly
Safety during assembly Is of utmost importance, particularly with children’s natural curiosity. While new playsets may tempt young ones with their excitement and potential, it is crucial to keep children at a distance during assembly. Loose parts, tools, and sudden movements or toppling structures could pose risks that require protection. Establish a clear boundary by installing a safety gate or engaging them in another activity in another room to keep children away. And facilitate an efficient assembly process – their joy upon seeing the finished product will make all worthwhile.
8. Tightening All Screws Properly
One of the most crucial steps of assembly is making sure every screw is tightened appropriately. Although it might seem like an insignificant detail, properly tightened screws ensure structural stability and longevity. When tightening with appropriate tools, make sure not to overtighten and cause stripping threads or material damage. Checking regularly as loosening due to wear and use may result in looser screws. Taking an attentive approach towards this step ensures both safety and peace of mind for its users.
9. Positioning The Kitchen Safely
Safety should always come first when setting up interactive play spaces like kitchens. Placing it where there’s minimal foot traffic reduces the chance of accidental bumps or trips while placing it on a flat surface eliminates wobbling and ensures stability for younger children.
Additionally, ensure to keep real appliances or hot areas far away to prevent confusion for younger children. And secure tall or top-heavy structures to the walls as preventive measures against tipping hazards. Taking these precautions will ensure a safe and delightful play kitchen environment where young chefs can explore their culinary imaginations with confidence!
Conclusion
Building a Kidkraft Kitchen requires more than simply following instructions. It’s about providing children with an environment in which their imaginations can run wild. From tightening each screw securely to positioning the kitchen safely. Each step contributes towards creating a safe play area for children to explore their creativity. While the process might require patience and meticulous attention to detail, its rewards far outweigh this investment. With proper care and planning your Kidkraft Kitchen will stand as a testament to quality craftsmanship as well as providing endless hours of creative play!