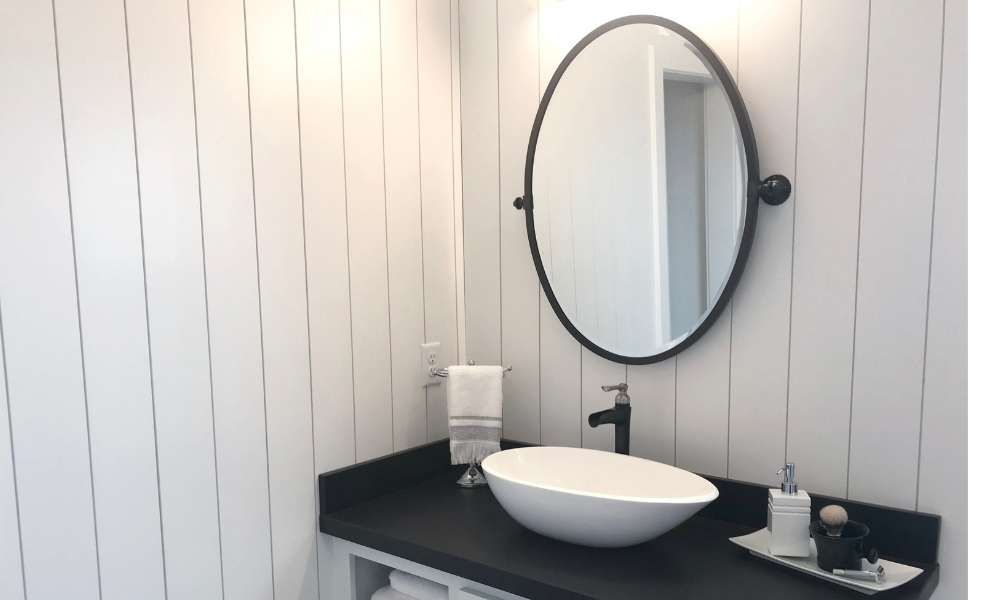
If you’ve been thinking about doing your bathroom with a refreshing and welcoming makeover. Installing shiplap flooring is an excellent way to create an elegant, rustic appearance. It is well-known for Its timeless aesthetic And distinct horizontal planks, Which can enhance the look Of your bathroom. No matter if you’re A skilled DIYer or are new To the hobby this guide will show you how To install the shiplap look in your bathroom. From choosing the appropriate materials to making sure you get A perfect look, We’ve got you covered. Begin To embark On this thrilling renovation project For your home And make your bathroom A new place To live by embracing timeless beauty.
What Is A Shiplap In Bathroom
The term “shiplap” in the bathroom is a wall covering that is made up of horizontal wooden planks of wood that are arranged in a parallel pattern. The design feature Is well-known For its capacity To add A touch of vintage charm And traditional style To bathrooms. The majority of shiplap panels have distinct grooves or gaps between the planks, creating a visually attractive texture and pattern.
Apart from its attractive appearance, It could be used for practical purposes. It is A great way To cover flaws in walls Or shield the walls from water damage. Installing A panel in the bathroom is An effective method To alter the space’s ambiance while preserving An inviting And cozy ambiance.
Bathroom Shiplap Ideas
Shiplap has A timeless appeal And versatility And provides A variety Of options For enhancing the aesthetics Of your bathroom. A popular option is To use A shiplap as An attractive wall. If you choose A traditional white to give a fresh, airy feeling or pick a more bold color to add visual interest, it can be the focal point of your room.
Another approach that Is innovative is To apply A shiplap On the ceiling, Which can bring A feeling Of warmth and intimacy to the room. For a more traditional approach think about half-wall wainscoting with shiplap. Which blends the traditional with the rustic to create a symbiotic and welcoming bathroom ambiance. The idea is to turn your bathroom into a sanctuary of luxury and style.
Materials You’ll Need
- Boards
- Measuring Tape
- Level
- Saw
- Nails or Screws
- Hammer or Screwdriver
- Adhesive
- Caulk and Caulk Gun
- Paint or Stain
- Safety Gear
01. Preparing Your Bathroom
Making your bathroom ready for the installation of a shiplap is an essential first procedure to make sure you get a positive and pleasing visual result. Start by cleaning the bathroom of any décor items like shelves or mirrors that will allow for unrestricted access to the process of installation. After that make sure the walls are thoroughly cleaned and remove any dust or dirt that could affect the adhesion of the.
It’s Crucial To look for leaks Or issues with moisture And then address them quickly To avoid further complications. To ensure safety. Think about switching off electricity and water if needed. Finally, accurate measurements And meticulous plan are the keys to an efficient installation So make sure you take measurements of the area and design your plan carefully.
02. Measuring And Cutting
Precise measurement and careful cutting are the keystones to an effective shiplap installation within your bathroom. Begin by taking A careful measurement Of the wall’s dimensions And calculating any obstructions such As outlets Or switches. These measurements will Be your guidelines To determine the amount Of plywood required For the project. It is recommended to buy an extra piece to account for potential mistakes or repairs that may be required in the future. Be sure to take accurate measurements and well-crafted cuts will guarantee a smooth. Attractive shiplap installation and improve the overall appearance of your bath.
03. Installing The First Row
Installing the first-row shiplap in your bathroom will mark the beginning of the project. Start by choosing the most straight and level board for the first row. Utilize a level to make sure that it is perfectly horizontal. Make any adjustments that are needed. After that, you can secure this board onto the wall leaving some space on the bottom of the board to account for any growth. The first row Is the base For the remainder Of the installation. So be sure To take your time To ensure that It is solid and level prior To moving on To the next rows.
04. Adding the Next Rows
As you progress with your shiplap installation in the bathroom, adding the next rows becomes a meticulous yet rewarding process. After securing the first row, overlap the subsequent row’s shiplap boards, ensuring a snug fit and concealing the grooves for a seamless look. Continue this pattern, staggering the joints for added stability and aesthetic appeal. Use a level to maintain horizontal alignment and secure each board with nails or screws. This step-by-step approach ensures A professional And visually pleasing result. Transforming your bath with the timeless charm Of shiplap.
05. Rimming And Corners
Making sure that the edges and corners are perfect is an essential aspect of putting up a shiplap wall in the bathroom. To achieve smooth, polished corners requires exact measurement and cutting shiplap pieces to fit in corner spaces. To improve both aesthetics and structural strength, Think about using corner trim pieces. When trimming openings such as doors or windows, you should ensure that the fit is perfect. Paying attention to these small details by taking care with precision will result in a stunningly completed shiplap installation. Elevating the overall appearance Of your bathrooms.
06. Sanding And Priming
Once the installation of the shiplap in your bathroom is completed The next step is priming and sanding. Start by gently sanding the surfaces of the vessel in order to smooth all rough edges or flaws. This process not only gives the shiplap the appearance of polished but creates a perfect surface for stain or paint to stick to. After completing the sanding process And applying the primer, You can proceed To apply it To the. The primer not only enhances paint adhesion But also seals the wood to prevent moisture damage. By sanding and priming your shiplap correctly, It’s ready for finishing To unveil Its full potential in transforming the bathroom visually.
07. Painting Your Shiplap
Painting your shiplap in the bathroom Is the final transformative step In this DIY project. Choose A paint color that suits your desired ambiance, Whether it’s a classic white For a clean, Airy feel, Or a bold hue To make A statement. Applying the paint evenly And in thin layers ensures A smooth finish, Accentuating the shiplap’s distinctive texture. Take your time, Allowing each coat To dry thoroughly between applications, And pay attention To corners And edges for A polished look that elevates your decor.
08. Best Shiplap For Bathroom
Selecting the most suitable material for your bathroom is vital To ensure both durability And aesthetics. Therefore, It’s essential To choose A moisture-resistant material such As PVC Or even moisture-resistant MDF. This ensures can withstand the humidity, preventing issues like warping or mold development. Think about the design And the finish that complements the decor Of your bathroom. Whether It’s an elegant white to create A classic appeal or A wood stain for A rustic look, Ensure that the shiplap panels are Of the highest quality and sourced reliably.
Final Touches
Installing a shiplap into your bathroom could Be an enjoyable DIY project that can add To the timeless appeal And character of your bathroom. When you carefully measure, Cut, And then put in the shiplap creating A solid foundation To create A rustic And sophisticated ambience. Be aware Of edges And corners To ensure An elegant finish. And after priming and sanding select the appropriate paint color to highlight the texture of the. The final touches, Which include accessories And decor elements, Make the whole look complete. With the right preparation and focus on the small things your bathroom could transform into a relaxing and inviting space that shows the long-lasting charm of the shiplap.